Does your suit fit well?
Custom fit for effortless movement.
Every year we update our TryOn Patterns.
Ever wonder how a suit jacket should fit?
1. Do the suit jacket lapels should lay smoothly against the chest, with the jacket collar resting smoothly against the back and sides of the shirt collar?
2. When looking at the jacket from the side, does the hem of the jacket form a horizontal line?
3. When in a relaxed stance, do the sleeve heads should not have any visible creases?
4. Does the jacket’s top (closing) button fall at the narrowest point of the waist (or, on some, the widest)?
5. Is the jacket shoulder approximately the same width as the customer’s shoulder? The only exception is when the customer’s shoulders are narrower than their hips; in this case, it’s advisable to choose a shoulder width slightly wider than the actual shoulder.
6. Does the back of the jacket have some extra width, so that you can move your arms forwards? The pleat caused by this extra width is called the ‘drape’ or ‘comfort creases.’
7. It should be possible to button the waist of the jacket without creating tension on the button or an ‘X.’
8. The classic rule for the length of a jacket is that the jacket should just cover the bum. If choosing a different length, to keep the proportions flattering. We advise making sure the sleeve and the body of the jacket are different lengths, with the body longer than the sleeves.
9. A rule of thumb for the sleeve length is that, when the customer is in a relaxed stance, their hands should be completely visible, with the cuffs of the shirt sleeves sticking out showing slightly (1-1.5 cm) beyond the cuffs of the jacket sleeves.
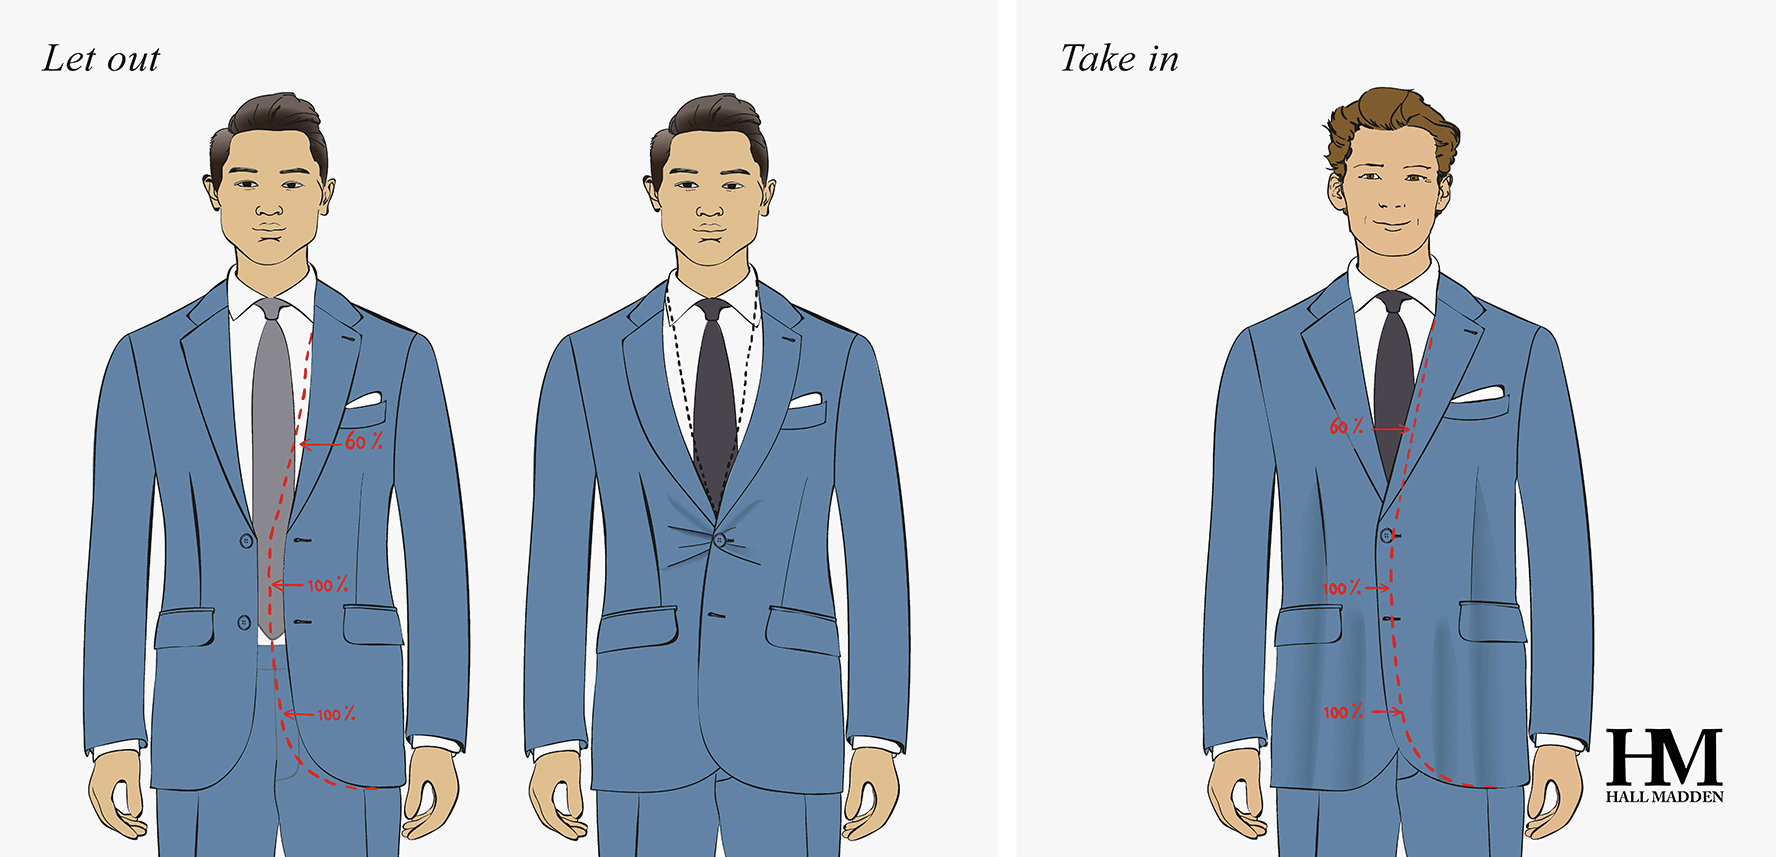
Let out jacket waist
When the jacket’s top button is closed, there’s tension on the button with visible ‘X’ creases pointing towards it.
At the back of the jacket, there is tension and visible creases at the sides of the waist.
Take in jacket waist
There is too much excess fabric around the waist of the jacket.
The waist of the jacket doesn’t follow the natural curve of the body.

Arm backwards
The jacket sleeves are positioned too far forward for the customer.
Diagonal creases are visible on the back of the sleeve, from the shoulder seam to the back seam of the sleeve.
Arm forwards
Rare; The armhole is too far back for the customer.
One or 2 diagonal creases are visible on the front of the sleeve, from the shoulder seam to the front of the sleeve

Raise Collar
There is a gap between the collar and the neck, but the customer doesn’t have a stooped posture.
The jacket collar is resting too low at the back of the customer’s neck.
As a result, more shirt fabric is visible than should be.
Collar Pleat
A horizontal ridge appears directly below the collar: a so-called ‘collar pleat’
The pleat is not wider than the customer’s ears. If it is, this means that the customer likely has square shoulders, and the square shoulder(s)’ FitTool should be considered instead.

Stooped posture
The customer, typically older, stands with slightly hunched shoulders, creating a more rounded back.
When positioning the jacket collar against the shirt collar, the hem will not form a horizontal line; the back panel hangs higher than in the front, tenting out at the hem because the fabric is pulled upwards.
In the front, with the top (closing) button closed, there is a gap between the lapel and the body near this button.
The front panels of the jacket are pulling to the sides, leaving a wider triangular gap at the bottom of the jacket front.
All of this indicates an incorrect balance, where the back is too short and the front is too long.
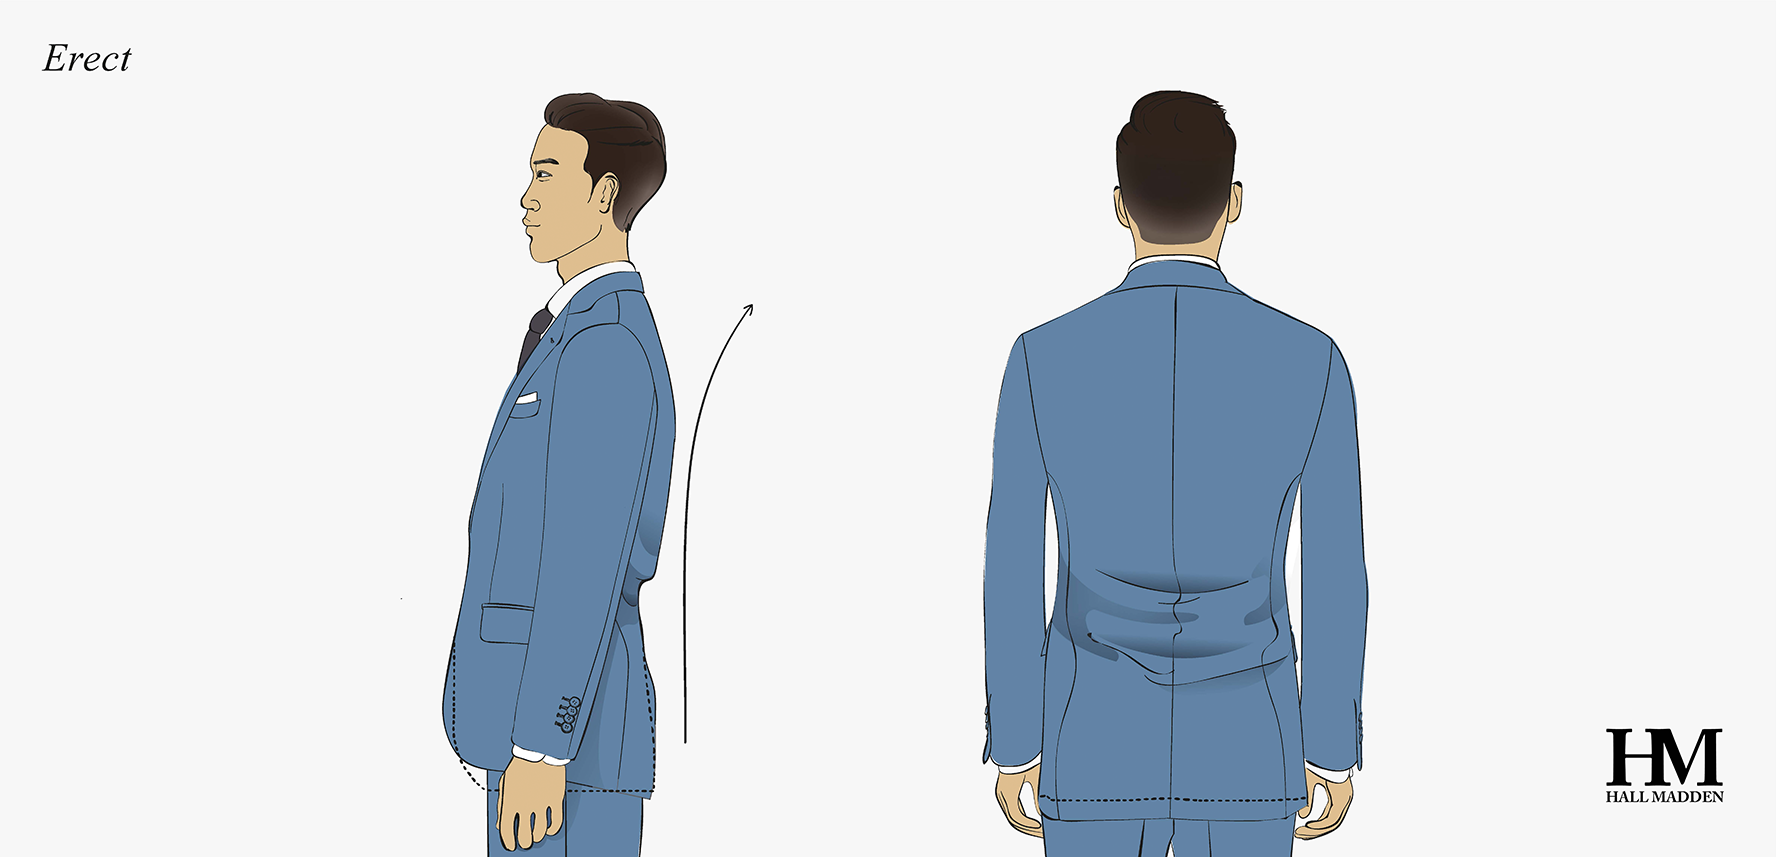
Erect posture
The customer’s upper body leans (slightly) backwards.
Seen from the side, the hem does not form a horizontal line: the back panel hangs lower than the front.
At the back, the fabric is bunched above the seat, causing horizontal creases.
All of this indicates an incorrect balance, where the back is too long and the front is too short for the customer.

Square Shoulders
The customer’s shoulders are more square than the shoulders cut into the jacket.
At the back, there’s a horizontal pleat curving from underneath the collar towards the shoulder, forming a ‘smiley’.
The pleat is wider than both the customer’s ears and the jacket collar.
At the front, a gap could appear between the jacket lapel and the shirt between the neck the chest pocket.

Sloped Shoulders
The customer’s shoulders are more sloped than the shoulders cut in the jacket.
At the back of the jacket, diagonal creases are forming underneath the armhole.
Minor creases might also be visible at the front, underneath the armhole.
When one of the 2 shoulders is more sloped, a gap appears between the lapel and shirt just above the top (closing) button on the side of the lower shoulder.

Closing Button
The top (closing) button is positioned higher or lower than the customer prefers.
The top button is getting stuck above the customer’s belly, pulling up the jacket front.

Armhole
The armhole is cut too low for the customer, restricting the customer’s range of movement.
When the customer moves or raises their arms, the jacket moves around or lifts up.

Take in Collar
Gaps appear at the left and right sides of the neck, between the shirt and jacket collars.

Let Out Shoulder
The customer’s shoulders are wider than the shoulders of the jacket. This might cause the fabric to stretch too tightly across the back.
The shoulder is pushing out the fabric of the sleeve head, with the shape of the customer’s shoulder visible through the fabric.
Take In Shoulder
The shoulders of the jacket are too wide for the customer’s shoulders.
The extra fabric might buckle in a little bit on the shoulder seams.

Let Out Back
On the back of the jacket, just below the armhole, there is no extra fabric to give the arms space to move forward. (There should be approximately 1.5 cm of extra fabric on each side.)
Small horizontal creases might be visible at the centre of the back and/or along the side seams in the back.
The customer’s movement is restricted when trying to move their arms forwards.
Take In Back
On the back of the jacket, just below the armhole, there are clear vertical creases visible.
There is more extra fabric than the approximately 1.5 cm needed on each side for comfort.

Let Out Chest Front
The jacket is tight around the chest, with the lapels pulling away from the chest.
A (little) bend is visible in the middle of the lapel.
Take In Chest Front
Vertical creases are visible at the sides of the chest, just below the armhole, due to excess fabric.
There is more fabric than needed for comfort.

Let Out Hip
When the jacket is buttoned, the jacket is too tight around the hem.
The vents at the back of the jacket are pulled open.
There is a triangular gap at the bottom of the centre front of the jacket, with creases pointing towards the top (closing) button.
Take In Hip
1.When the jacket is buttoned, there’s excess fabric at the hips.
The fabric is billowing over the hips and the seat, especially around the vents.

Take In Skirt
Your customer most likely has a prominent belly combined with narrow hips.
The bottom of the jacket’s front panels flares out, with vertical creases visible just below the side pockets.
Let Out Center Front
The jacket fits well across the back and through the arms but is too tight across the front.
It’s not only difficult to close the button at the waist, but the hip and chest also need more room.
With the button closed, the lapel might break, with too much tension on the button, and the jacket might pull up and cause the jacket’s front panels to overlap at the bottom.
Take In Center Front
When the jacket is buttoned, there is excess fabric across the waist, hips and chest, but the waist follows the natural curve of the body at the back and side panels.

Upper Arm & Armhole
The armhole and top portion of the jacket sleeve are too tight on the customer, and the jacket is too tight across the outer edges of the chest.
The fabric creases horizontally under the back of the armhole.

Upper Arm & Armhole
The armhole and top portion of the jacket sleeve are too loose on the customer.

Let Out Upper Arm
The jacket sleeve is visibly stretched across the customer’s biceps, leaving no room for movement.
But the armhole of the jacket fits well and is not too tight.
Take In Upper Arm
The jacket sleeve is too loose around the customer’s upper arm.
The armhole of the jacket fits well and is not too loose.

Let Out Cuff
The cuff is too tight for the customer.
When the customer tries to bend their arms, they are restricted by the tightness at the elbows and lower arms.
Take In Cuff
The cuff is too wide for the customer.
There is a lot of space between the shirt cuff and the cuff of the jacket.
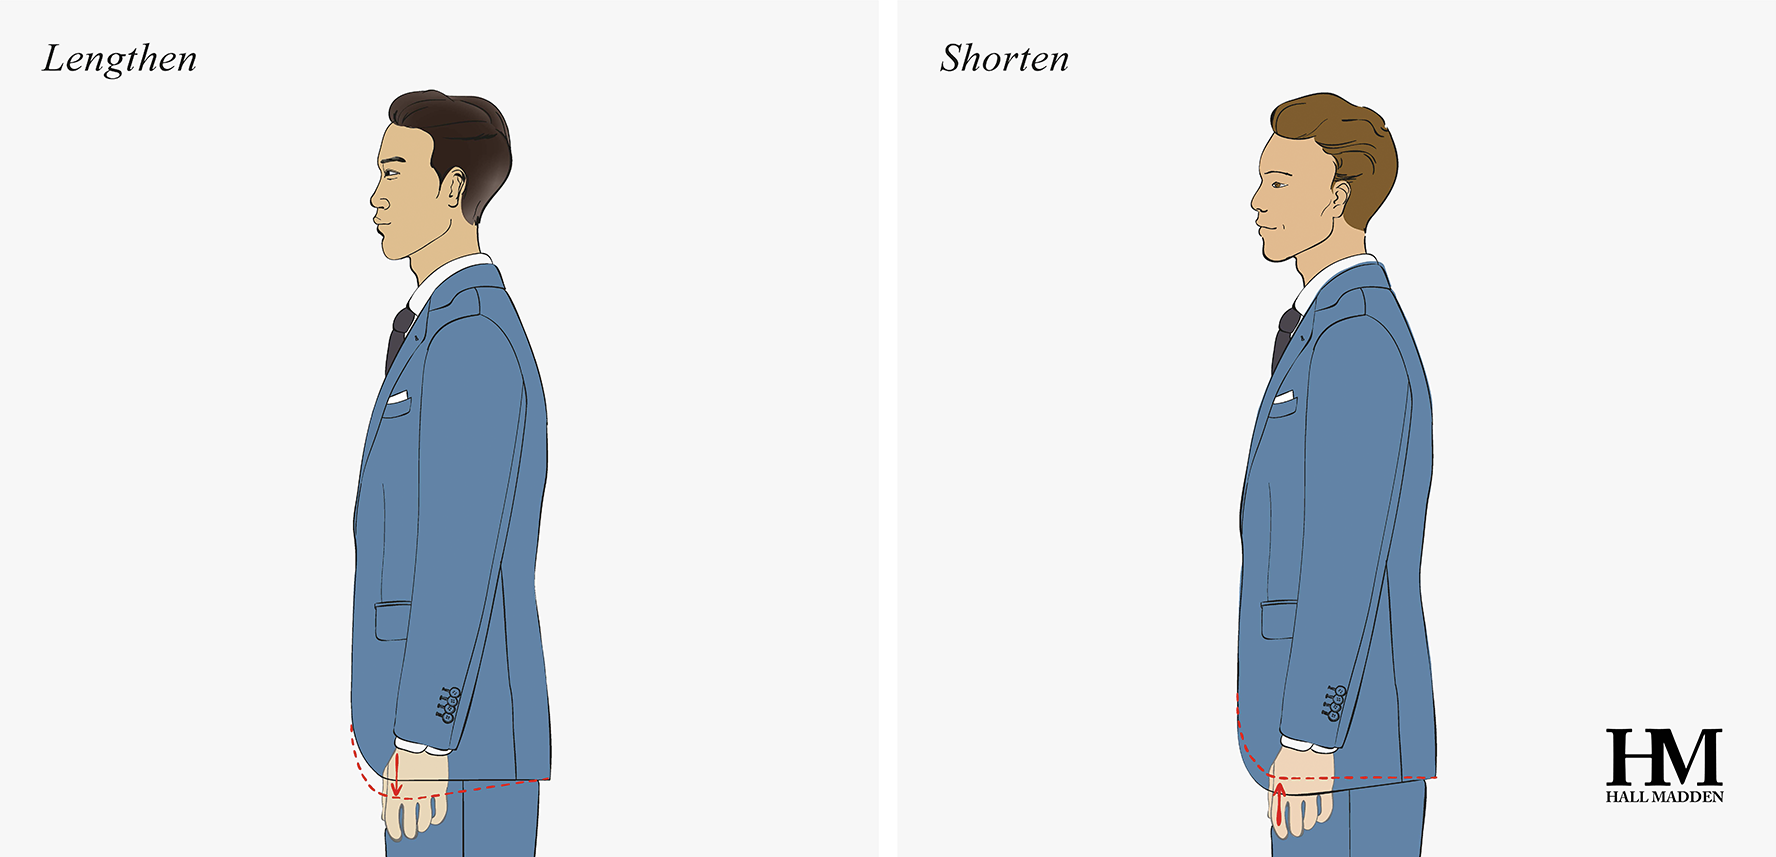
Lengthen Front
Viewing the jacket on the customer from the side, just the front of the jacket is too short, without it being the result of the customer standing too erect; usually because of prominent belly.
Shorten Front
Viewing the jacket on the customer from the side, just the front is too long, without it being the result of the customer standing stooped.

A classic reference for the length of a jacket is that it ends at the bottom of the seat.
Lengthen Length
The jacket is too short all the way around.
Shorten Length
The jacket is too long all the way around.
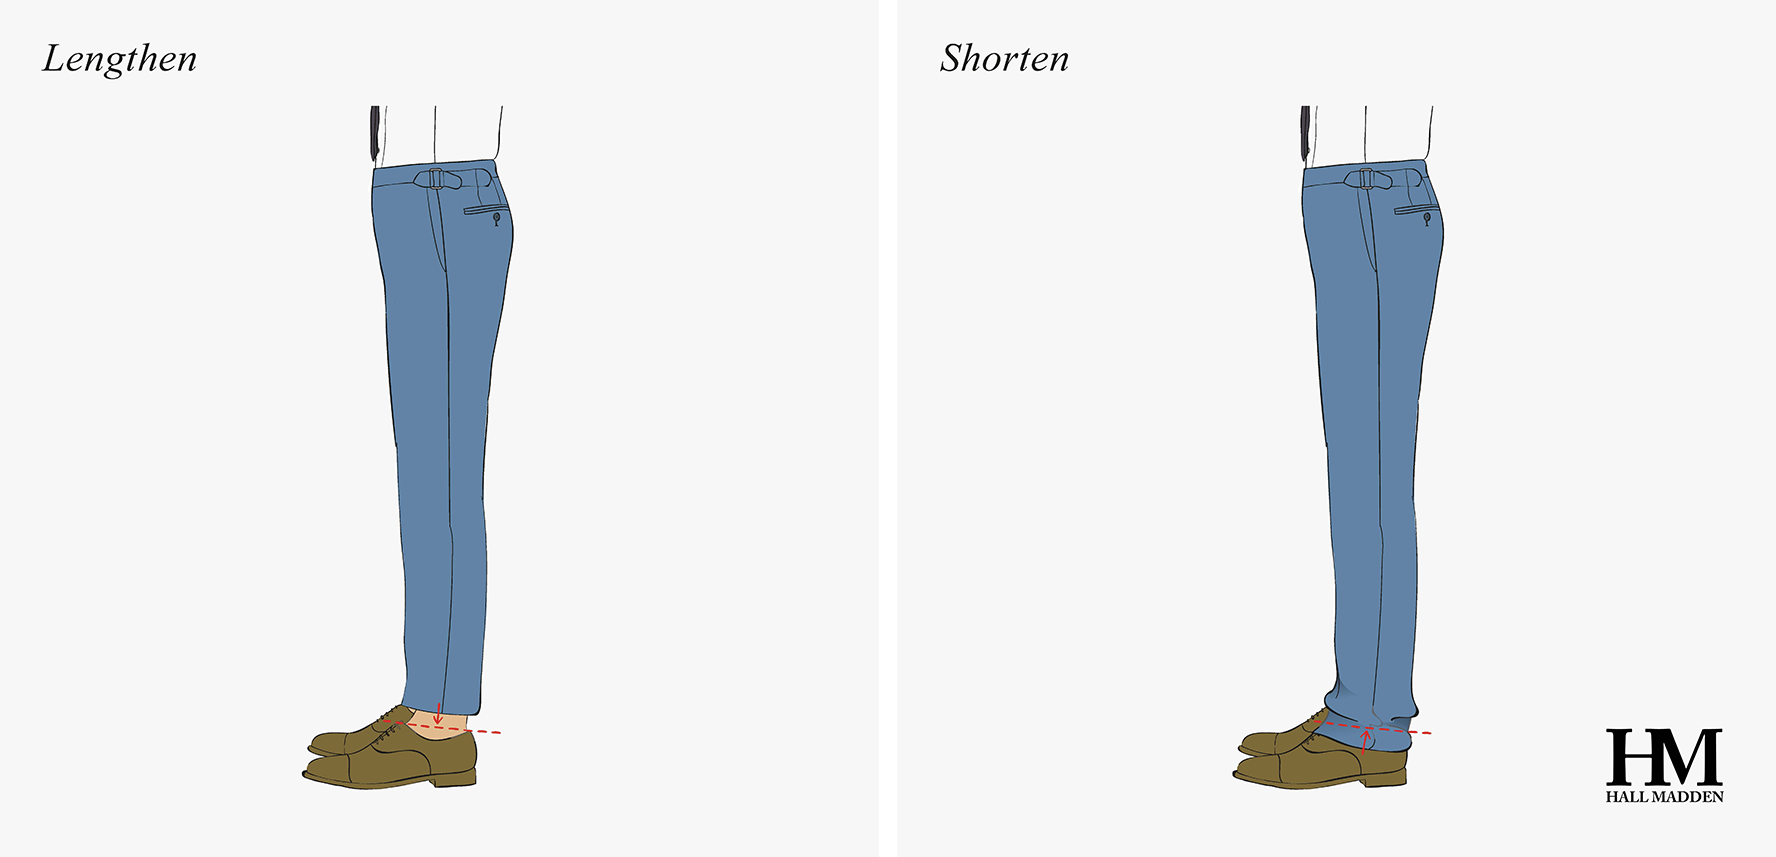
Hands should be completely visible with approximately 1-1.5cm of shirt sleeve showing.
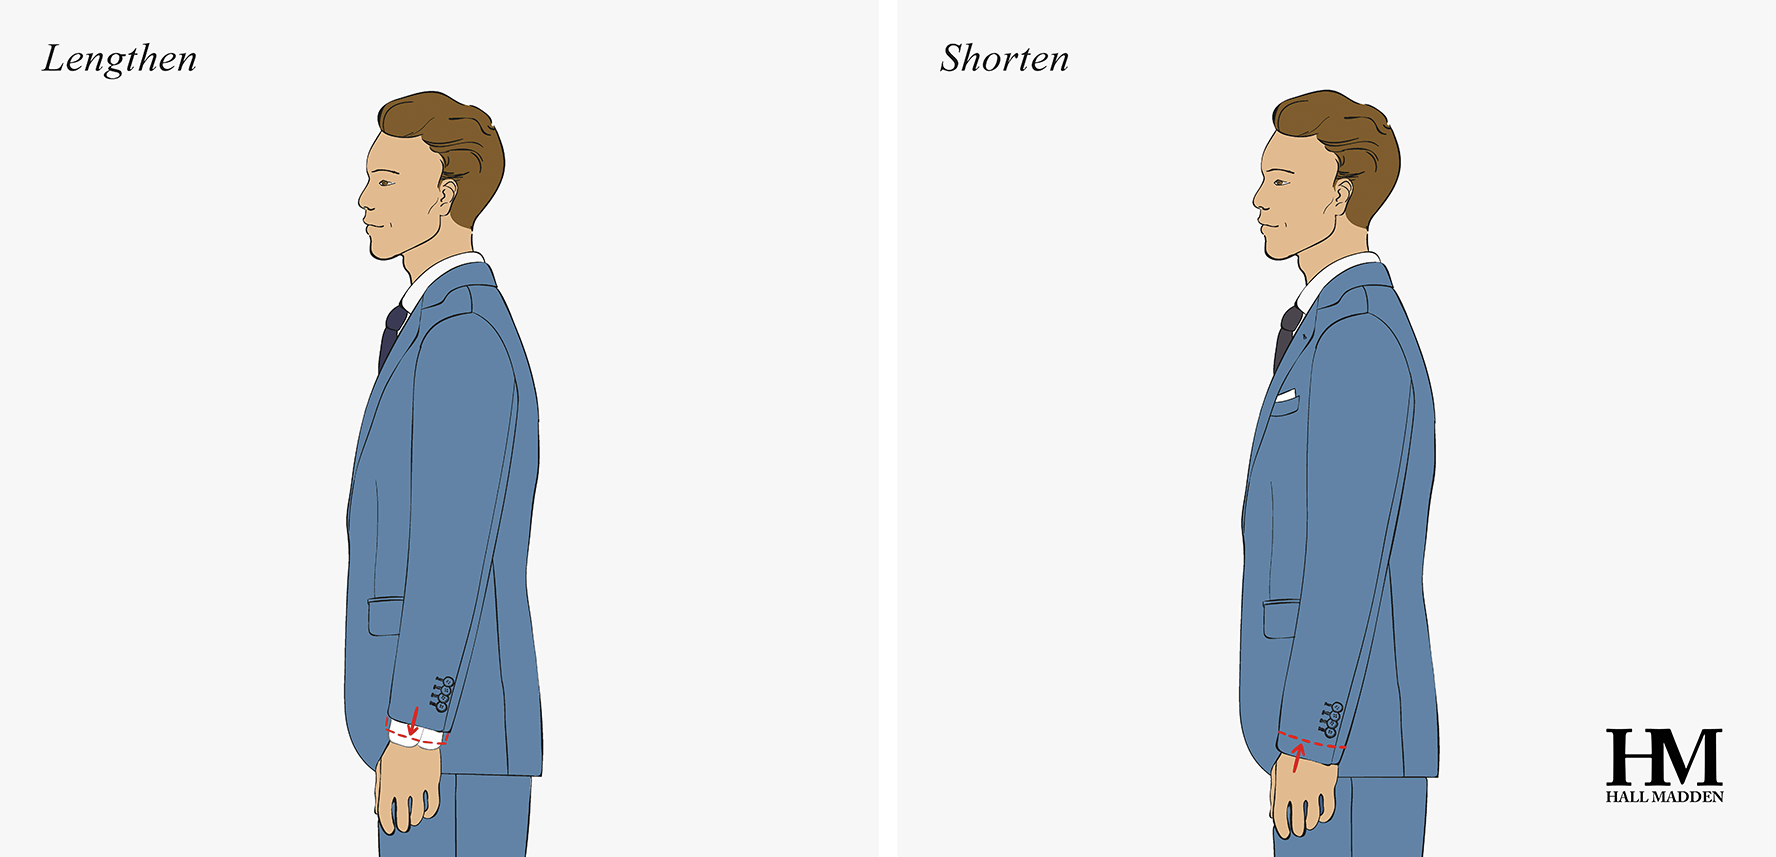
Lengthen Sleeve
The sleeve(s) of the jacket are too short.
Too much of the shirt cuff is visible.
Shorten Sleeve
The sleeve(s) of the jacket are too long.
Very little to none of the shirt cuff is visible.

Raise/Lower Side Pockets
The side pockets are placed lower or higher on the jacket than the customer would like.
Proportion-wise the side pockets need to be raised (based on preference).

Raise Vents
The vent starts too low (based on customer preference).
The customer has a strong seat, causing tension at the top of the vent, and it requires a longer vent to release tension.
Lower Vents
The vents are too long and end too high on the jacket.

Raise/Lower Chest Pocket
The chest pocket is placed either lower or higher on the chest than the customer would like.

Deep Chest Dart
The customer has a prominent chest in combination with a slim waist.
Common among bodybuilder types, or for customers with a strongly developed chest.

Forward shoulders
The customer’s shoulders point farther forwards than usual.
A pleat is visible, starting at the side of the collar and curving towards the front.

Shorten lapel
The jacket lapels buckle out away from the customer’s chest.
The lapels break just above the top button (see tips).
The lapels are too long, but the jacket otherwise fits cleanly across the chest and back.
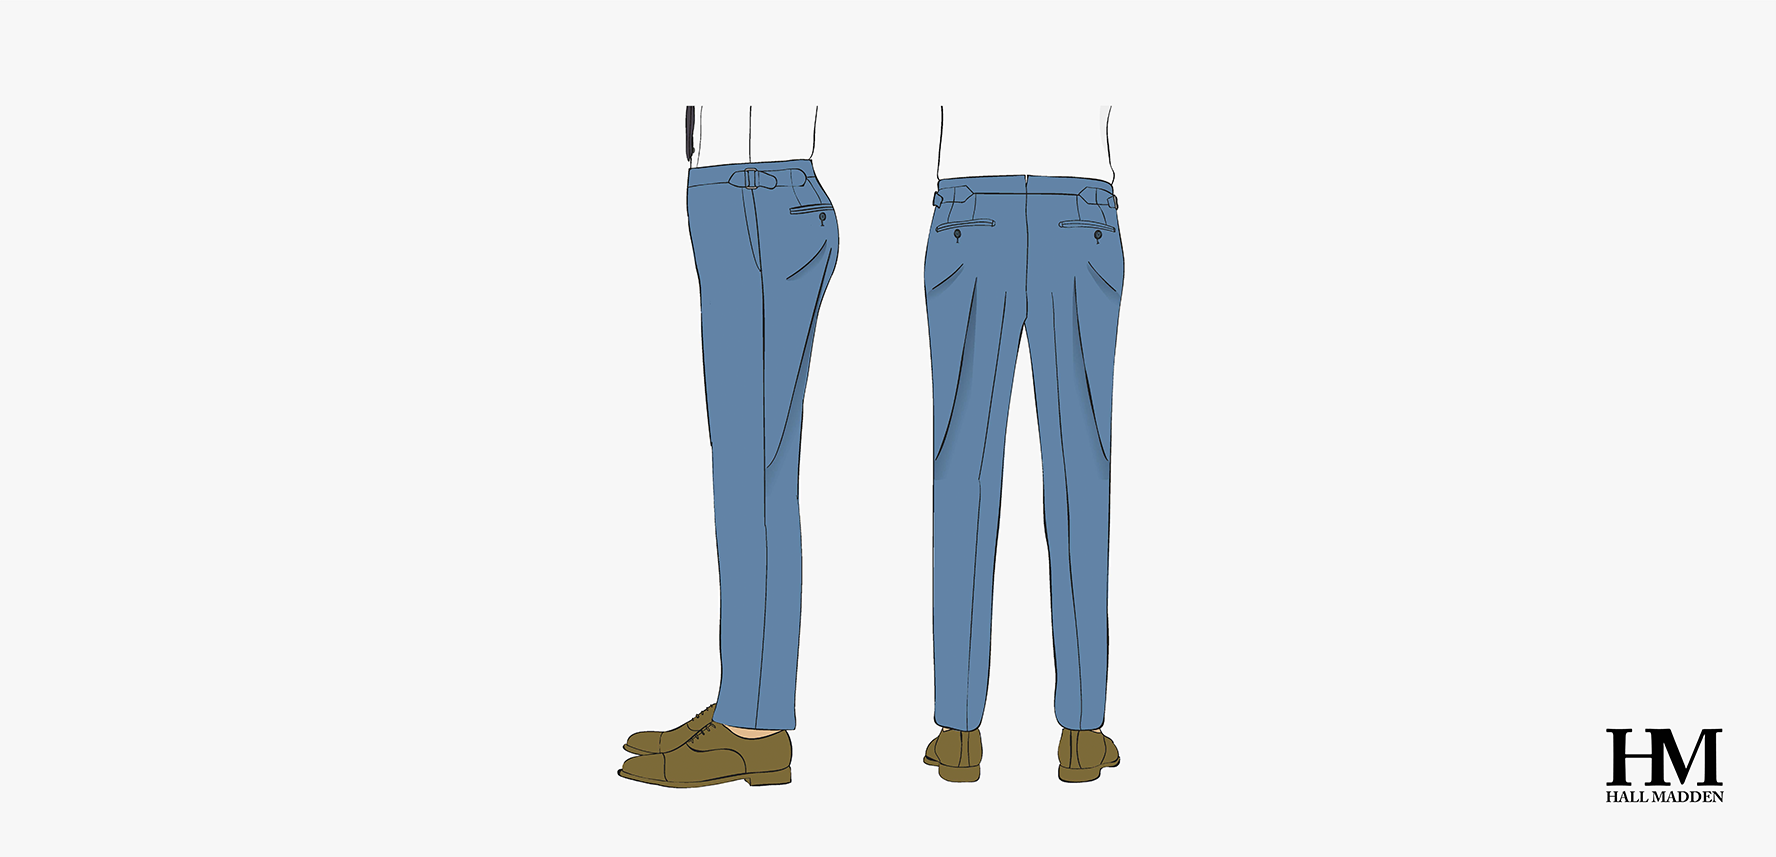
Ever wonder how suit trousers should fit?
4 questions to ask yourself about any trouser
The ideal ‘correct fit’ is mainly subjective, but these classic tailoring guidelines offer some best practices to help you ensure the best fit possible.
The waistband should be able to stay in place without help from a belt.
A flattering trouser fits closely around the seat. Be aware that the trousers always start out slightly tighter since they will stretch out a bit during wearing.
The width of the hem is a matter of personal preference, and a good tool to make an individual style statement.
A good reference point for trouser length is that the back of the trousers should fall in a straight line down at the back of the leg and form a slight fold in the front where they hit the shoe. This means that a trouser with a narrow hem should also be slightly shorter than a trouser with a wider hem.
Common problems we see in trousers
Although it’s impossible to make a suit with zero wrinkles and a perfect drape we most certainly try!
The waistband sits too low for the customer, when the crotch is positioned correctly.
When the customer pulls the waistband to their preferred position, the customer experiences tightness in the crotch.
The customer feels they need more coverage at both the front and the back.
Lower Total Rise
The waistband sits too high on the customer’s waist.
When the customer pushes the waistband down to their preferred position, the crotch becomes too baggy.
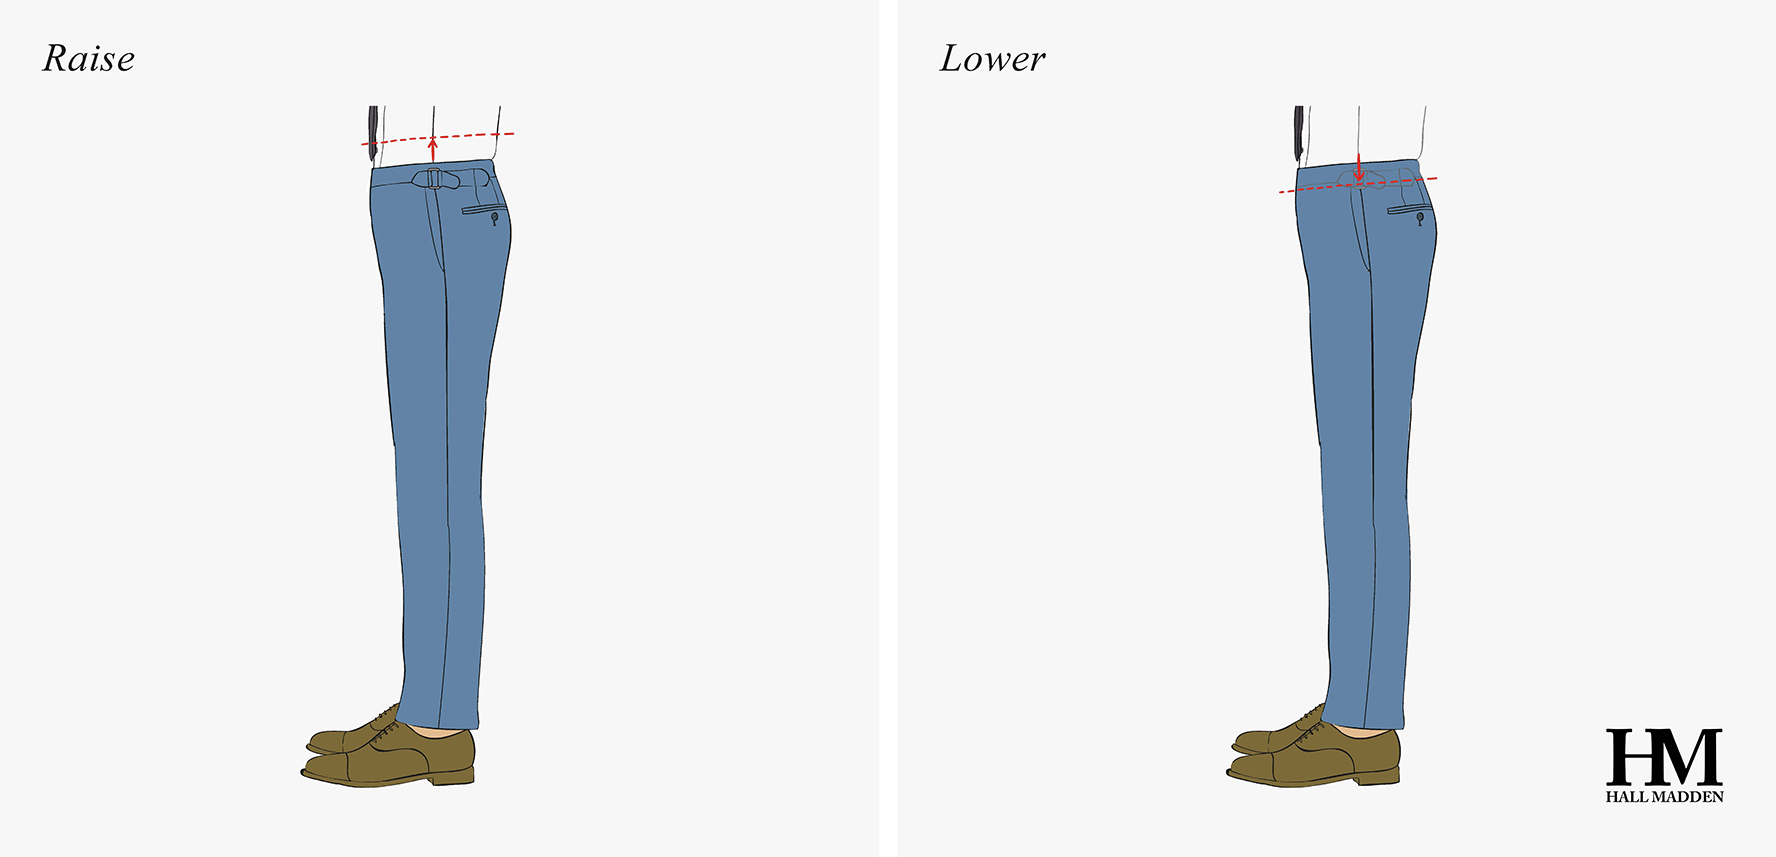
Raise Total Rise
The front of the waistband sits lower than the customer would like.
When the waistband is pulled up to the preferred position, vertical creases appear next to the crotch area.
Lower Front Rise
The front of the waistband sits higher than the customer would like.
The customer’s belly is pushing down the front of the waistband.
‘Smiley’ horizontal creases are visible just below the front the waistband.
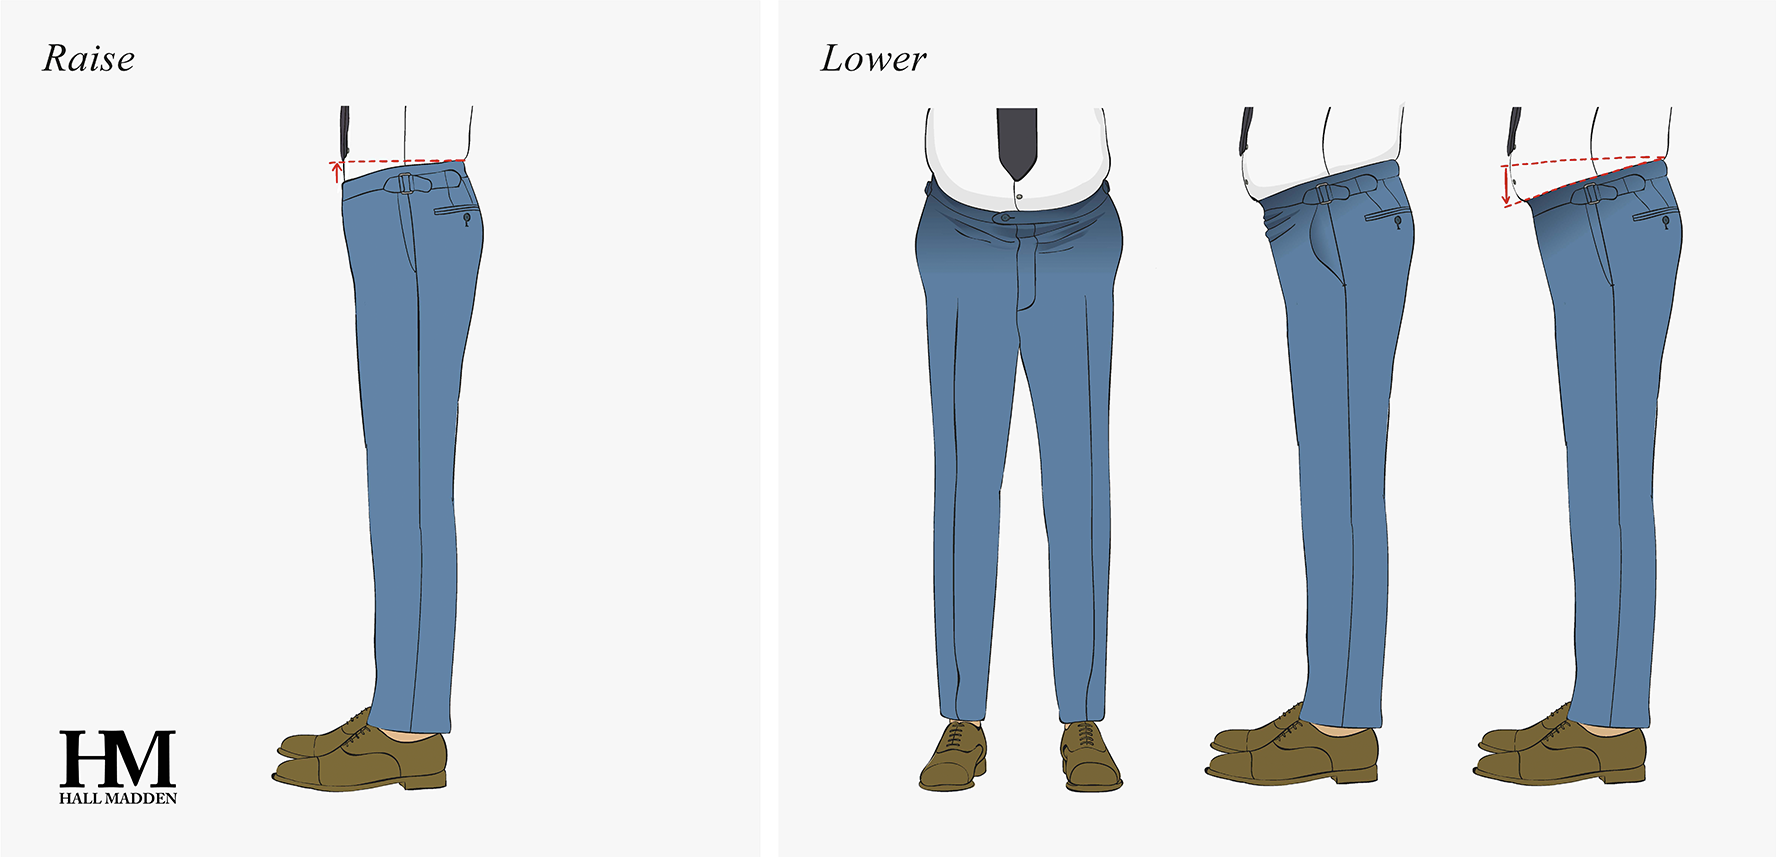
Raise Front Rise
The waistband dips at the back of the trousers.
The back of the trousers doesn’t fully cover the seat of the customer, or doesn’t rest smoothly in the curve of the lower back.
Lower Back Rise
The waistband sits too high on the customer’s back.
The customer’s body is pushing the fabric of the waistband down at the back and/or sides.
Curved horizontal creases appear just below the back of the waistband, no lower than the back pockets. Otherwise this is caused by another problem.
Raise Back Rise

The customer does not have a strongly developed seat and might have hips that jut forward.
Horizontal creases are visible around the thighs just below the seat, as if there’s too much fabric in the length.
Flat Seat
The customer has a strongly developed seat.
Creases might appear starting from the hip and/or knee pointing towards the highest point of the seat, even though the circumference around the seat is fine.
Prominent Seat
The trousers are too tight in the crotch; the seam is cutting up into the customer’s rear, although the trousers fit well around the circumference of the seat and the crotch is hanging at the right height.
When walking, the customer’s forward leg movement is restricted.
Creases are visible at the back, starting at the crotch and pointing diagonally downwards.
Take In Crotch
The crotch is too loose on the customer; the seam across the crotch is too long.
There’s too much extra fabric around the front of the crotch, although the trousers fit well around the seat.
Let Out Crotch
The customer can’t close the waistband, or the waistband is too tight even though the trouser fits nicely around the seat.
Take In 1/2 Waist
The waistband is loose around the customer’s waist.
There is space visible between the waistband and the customer’s waist.

Let Out 1/2 Waist
The trousers are too tight around the circumference of the customer’s seat.
The side pockets are gaping open, and creases are appearing at the seat level at the side and back seams.
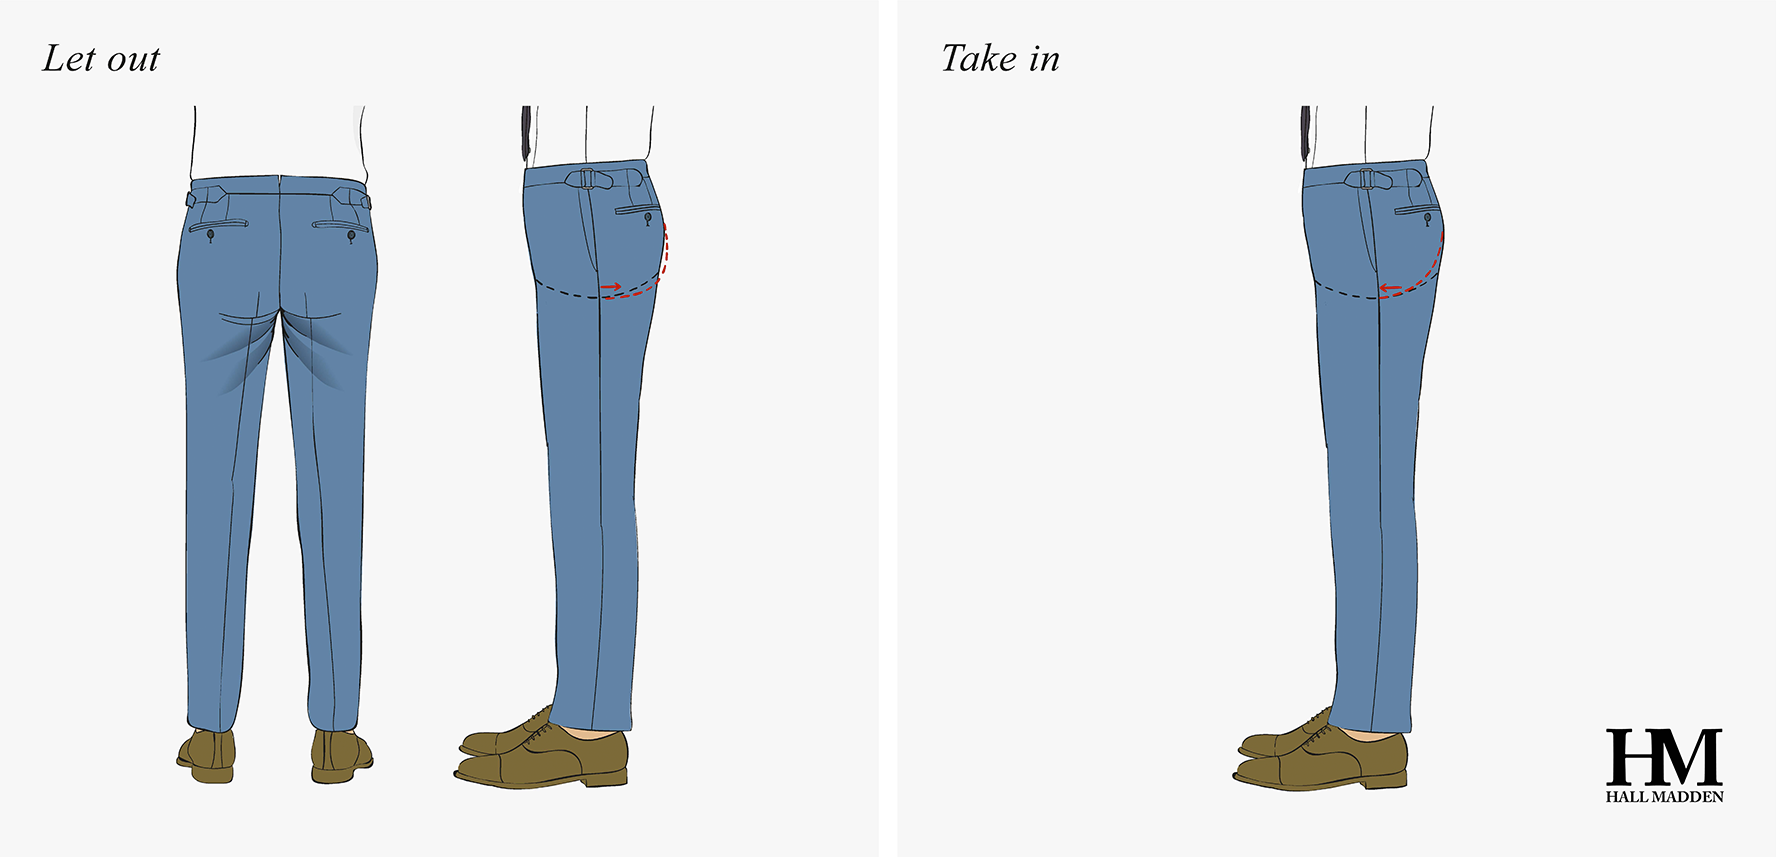
Take In 1/2 Seat
The trousers are too loose around the circumference of the customer’s seat.
Let Out 1/2 Seat
The trousers fit well around the seat of the customer, but at the back seam (only) there is excess fabric.
The fabric is draping vertically, creating a slight curtain effect.

Take In 1/2 Back Seam
The customer has prominently curved hips.
The trousers fit well across the back of the seat, and are only pulling at the side seams.
The side pockets are gaping open, and creases are appearing next to and below them.
Take In 1/2 Hip Curve
The customer has flatter-than-usual hips.
The trousers fit well across the back of the seat, but are clearly loose at the side seams. You can pin down the excess fabric without moving the back or front panels of the trousers.
Vertical creases appear next to and below the side pockets, and the fabric is draping like a curtain.
Let Out 1/2 Hip Curve

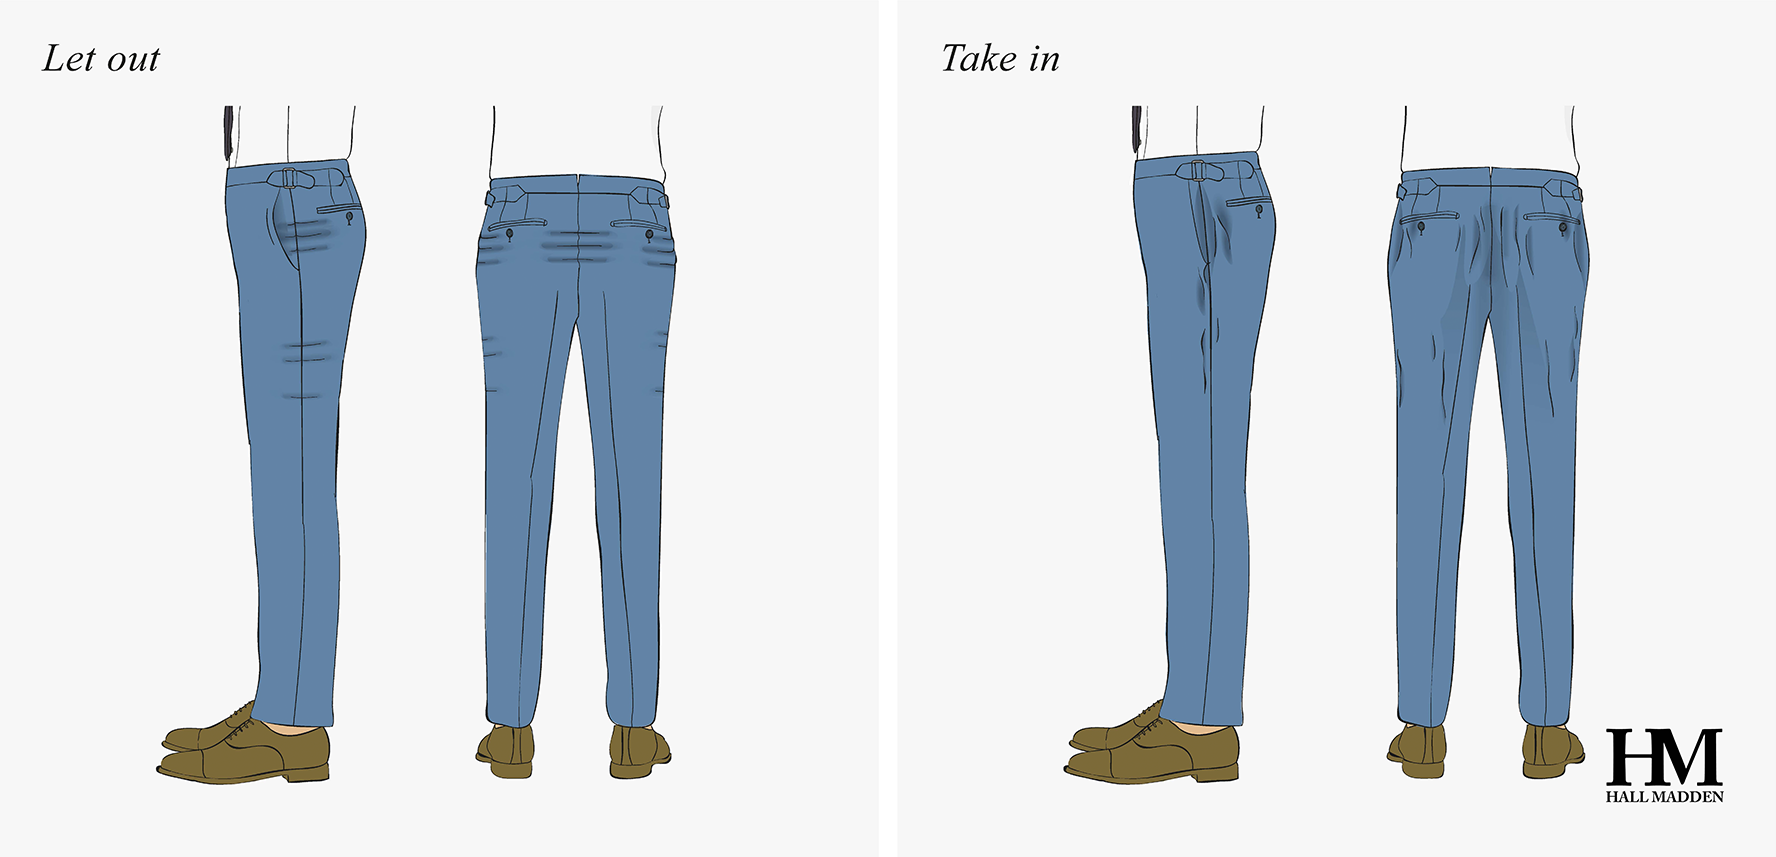
The customer has strongly developed thighs.
The trousers are too tight around the thighs and seat.
Take In 1/2 Thigh
The trousers are too loose around the customer’s thighs and seat.

Let Out 1/2 Thigh
The trousers are too tight around the knee.
Take In 1/2 Knee
The trousers are too loose around the knees.

Let Out 1/2 Knee
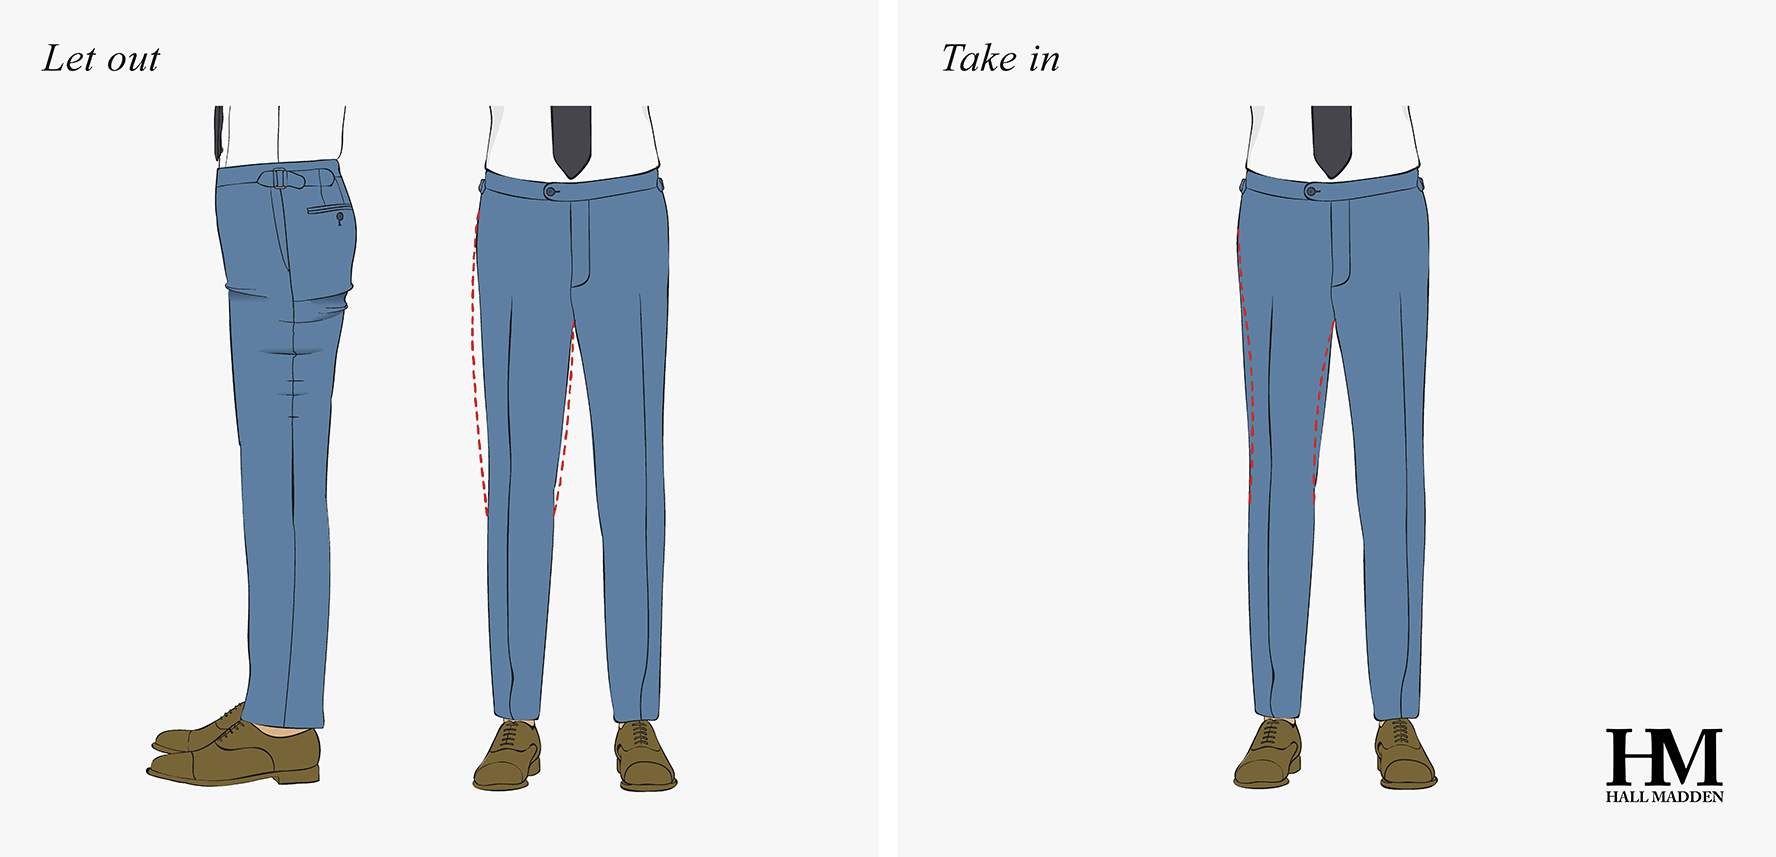
The trousers are too narrow at the hem for the customer’s preference.
Take In 1/2 Hem
The trousers are too wide at the hem.

Let Out 1/2 Hem
The length of the legs is too short.
Shorten Length
The trousers fit well through the waist and crotch.
The legs are too long for the customer.